
This is the third article I wrote for The Bushcraft Journal about doing simple bushcraft tasks with my non-dominant hand and came out in August 2015. If you haven’t subscribed to The Bushcraft Journal yet, why not!
One handed pot hanger
In my previous articles I’ve managed to light a fire and put up my tarp and hammock using only my left (non-dominant) hand without too much difficulty. And whilst I’ve been a little nervous about tackling these tasks, for my next challenge I really do feel some trepidation. I’m going to make a pot hanger and I’ve just read the awesome article in issue 3 of The Bushcraft Journal by Steve Watts and David Wescott. But more than having to live up to those high standards, this is the first time I’ll be using edged tools with my non-dominant hand. And some of you might remember that’s where it all began, with me proving to be less than competent at performing a tai chi sword form left handed.
My current task will involve me using an axe, knife and folding saw with my left hand and safety is going to be at the very top of my priorities; I’m determined to not get so much as a splinter let alone cut myself. I strongly suggest that you only try these techniques if you are already skilled in the use of edged tools and that the best way to learn how to use them effectively, efficiently and safely is to get proper tuition.
I decide to make a Burtonsville Rig (the name is new to me) and go off to find the materials – straight thin, green stems, so I look for willow, hazel, ash, sycamore etc. I quickly find some hazel stools. I strike gold and spot a stem that is long and straight and has not one but two forks part way up; this stem will provide all of the materials I need.
I take out my folding saw. Up until now I haven’t considered this, but now I’m puzzled as to how I can push the ‘open’ button and move the blade at the same time. I hold the saw against my right side using my right forearm, push the ‘open’ button with the middle finger on my left hand and prise open the blade with my thumb and index finger.
I cut at the bottom of the stem and find that this simple action is relatively straightforward with my left hand. I cut about 1/3rd of the way through at the front, then move the saw to the back of the stem a little higher up and cut right through. This stops the stem from leaning forwards and closing the saw cut and jamming the saw.

Finally I make a third cut angled away from the stool to tidy things up. It’s important to me that I prune trees in a way that will allow them to recover easily and so I always try to leave clean cuts behind me.

Often I use the ‘plumber’s vice’ to trim hazel stems and so I decide to give it a try now. I place the stem just above the front of my right knee and into the back of my left knee. Usually I’d bring my left hand across my body to keep the stem steady (and out of the way of the saw), but have to settle on using the saw to do the same job. I gingerly start sawing and it proves to be easy to do. With my materials collected and cut, I return to my overnight camp.

Back at camp I decide to start off by making the prop stick. First up I need to put a point on the larger of the forked sticks. I try to hold the stick under my right arm and use my knife, but without having a hand to grasp the stick, I find that I can’t hold it tight enough. And then I spot an old stump on the ground and decide to try a different approach using my axe. For me the axe is my most important piece of kit, more so than a knife, and if I could only have one thing with me, it would be my axe. Of course in the real world I don’t have to make that choice, but in the past when I’ve been asked what knife I carry as a backup, I’ve replied “An axe”, in complete seriousness.
I place the fork of the stick into my right armpit and the other end on the stump. I wrap my right arm around the stick to hold it still. I choke my axe in my left hand and use small cuts on the far side of the stick to put a point on; this keeps the stick between the axe and me. It’s actually not too bad as the action is simple and small. Hammering the stick into the ground left handed is getting easier after my previous experience with my tarp.

Next I place the saster stick in the forked prop stick and wiggle it around a bit to find where it wants to sit. With this done I mark a horizontal line on the end and saw along that line. Take a look at the photo of the pot hanger attached to the saster stick to see what I mean.
Now I need to make a peg to fix the saster stick into the ground, so I use the other, smaller forked stick. I need to put points on the two prongs of the fork and as these are much smaller I decide against using my axe again, I’m not keen on using it so close to me. So I try a variation of the chest pull knife cut I often use in carving. I kneel down and place the end of the forked stick into my sternum and hold it in place by putting my right forearm in the fork. I carve a point on the bottom prong by moving the knife away from me, which makes me feel safe. Then I turn the fork around and carve the other prong. It’s easy to hammer the peg in now.

Next I need to make the ‘dangler’ (which I recently learnt is actually called a notched pot hanger). I suspect this will be tricky as it involves some intricate knife cuts. I mark out the lines I’ll follow for the cuts. I score a stop cut on the end of the cross that is closest to the centre of the stick. I need to carve out the left, right and bottom sides of the cross and puzzle over how to accomplish this for a few minutes.

I decide to go with a variation on a method of feather sticking and kneel down and lean forward with one end of the stick in my sternum and the other on the old stump I used earlier. When I teach this posture for making feather sticks, both hands are on the knife but here only one is. And although the stick is between the knife and me, and the stick feels secure and that it won’t move, I’m not entirely comfortable with this and wouldn’t recommend that you try unless you really have to.
I make the cuts downwards, which leaves the shavings attached at the stop cut, so I lay the stick on the stump and cut them off.

Now I need to make my undercut. Normally I’d do this with a knife but after trying a few options decide against it as I can’t find a way to make the cut that doesn’t involve brining the knife towards me. So instead I decide to use my saw to make the undercut.

That’s one end done, not as neat as I’d like, but certainly functional. Now to repeat the process and do the other end. Remember to make sure the point faces into the centre again. And to add my two pence worth into the debate, I put my cuts on the same side of the stick.

I’ve made a slight modification to my pot and replaced the handle with some bike brake cable fastened with an electrical connector as I find it fits in the notch better.

I hang the ‘dangler’ from the saster stick and

the pot from the other end.

My pot hanger is finished and I’ve avoided injury, but one of the techniques I’ve used in particular is risky. And as I reflect on this I realise that my focus has been in the wrong place. I decided that I wanted to make a pot hanger and not just any old pot hanger but a very specific one, because that’s what I always make. But what I really wanted to do was get my pot over a fire so I could cook and with this realisation come other options that should be far simpler to do and less reliant on edged tools. So I decide to give them a go.
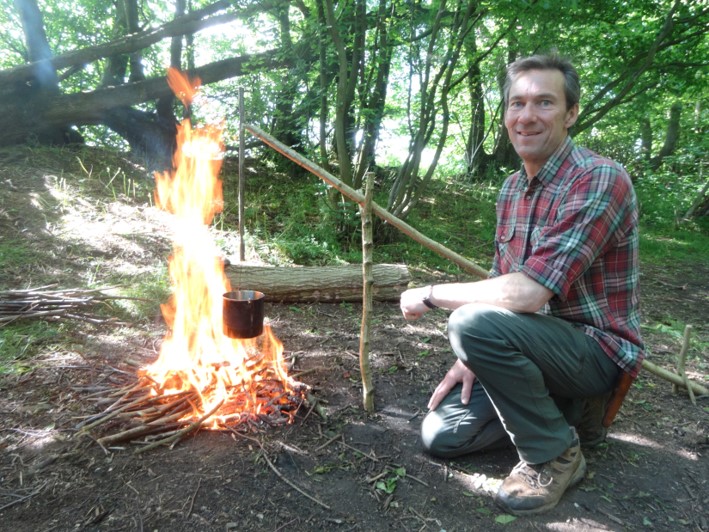
First up I make a crane. I prepare a second forked stick, knock it into the ground the other side of my fire and slide the main pole through the handle of my pot and put it between the 2 forked sticks. This is actually quite tricky as I’m trying to hold the weight of the pot and the pole in one hand and at the end, but it works.

Next up is a stew pole; I shorten my forked stick and simply hang my pot from the pole. OK, I don’t have any real temperature control but I’ve removed the need to make some intricate knife cuts, which can only be a good thing in these circumstances.

Lastly I decide on fire dogs so put a log on either side of the fire, then add 2 more on top of those at right angles and sit my pot on top (although I should have taken a few minutes and found greenwood to use!). Simple and effective with minimal effort and greatly reduced use of edged tools.

This one has been a real eye opener for me and has forced me to do the de-constructing that I wanted to do. I’ve learnt that I need to think about what I’m doing and why I’m doing it and that sometimes coming into a situation or activity with pre-conceived ideas isn’t helpful, that it’s best to consider any given scenario according to its own merits. And of course, this has really brought home to me the oft repeated bushcraft adage around the power of knowledge; this experience has demonstrated that the more ways I know to undertake a particular task, the more options I have in any given situation.
Thanks go to Stefano Peria and Stephen French for helping me out on this one.